Chocolate Pretzel Chicks and Bunnies for Easter
As an Amazon Associate, I earn from qualifying purchases. Read the full disclosure here.
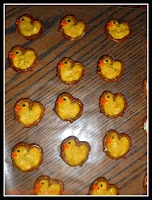
These easy to make chocolate pretzel chicks and bunnies are perfect for Easter. They will delight adults and kids alike!
Years ago I used to have a monthly reward party for my students at school. I always made themed treats for the occasion that I thought they would enjoy.
Some of my favorite Easter treats have been Easter Egg Surprise Cookies and Easter Malted Milk Brownies. One of the kids favorites were the PEEPS Hot Cocoa Bombs. For a party I love making an Easter Dessert Board.
One year I came up with the idea to make chocolate covered pretzel chicks and bunnies for Easter. I found some pictures and thought that I could replicate them without too much trouble.
I liked that this was a no bake treat that I wouldn’t have to make in the oven. All you really need are pretzels and different colored candy melts.
What are candy melts?
Candy melts, also known as candy wafers or melting wafers, are small discs made primarily from sugar and vegetable oil. They are created to melt easily. This makes them ideal for coating, dipping, and molding candies, as well as for creating decorative designs on baked goods. Candy melts come in many different colors and flavors. They are often used in making cake pops, chocolate-covered strawberries, and candy decorations for cakes and cookies.
Candy melts can be bought at most craft stores. They can also be bought at many grocery stores in the baking aisle. Just be careful; not all candy melts are created equally and some taste much better than others. I personally prefer Merckens candy melts.
Ingredients:
- yellow candy melts
- white candy melts or white coating chocolate
- orange candy melts
- pink candy melts
- dark chocolate melts (you can also use milk chocolate if desired)
- pretzel twists (either mini or small depending on the size you want to make)
Before beginning place a large sheet of parchment paper on your work surface. This will ensure that you will be able to get the chocolate pretzels off of the work areas and into their storage container.
Line the pretzels up on the parchment paper making sure there is at least an inch in between each pretzel so that you can work on it.
Work with one color at a time and melt either the white candy melts or the yellow candy melts.
How do I melt Candy Melts in the microwave?
Place candy melts in a microwave safe bowl. Microwave the candy melts in 20 second intervals, stirring well after each heating. Continue heating in 20 second bursts and stirring until the candy melts are completely melted and smooth.
How do I melt candy melts in a double boiler?
To create a double boiled fill a saucepan with a few inches of water and bring it to a simmer over medium heat. Place a heatproof bowl (either glass or stainless steel) on top of the saucepan making sure that the bottom does not touch the water. Add the candy melts to the bowl. Stir occasionally as they melt. Keep stirring more frequently until the melts are completely melted and smooth. Remove the bowl from the double boiler to prevent over cooking.
Place the melted yellow candy melts in a zip top baggie and snip off the end. Fill in the holes of the pretzel and the connecting pieces. Allow the candy to harden. Repeat this process with the white candy melts and the other half of the pretzels.
Initially I thought that the chicks would be more difficult to make but it turned out it was the bunnies that gave me the most problems. The original recipe calls for edible markers to draw on the details but I had 9, yes NINE, open bags of colored chocolate in the refrigerator so I just used those which worked well.
Melt the orange chocolate and place in a small zip top bag. Cut the corner off of the bag to make a thin tip. Pipe a v shape on the left side of the pretzel to make the beak.
Heat the dark chocolate and place in a zip top bag. Pipe an eye on each chick, two eyes on each bunny, and a nose on each bunny.
Heat the pink candy melts and place in a zip top bag. Pipe pink ears on the bunnies and a mouth on each bunny.
How do I store these pretzels?
Store the pretzels in an air tight container for up to 2 weeks. Parchment paper should be placed in between layers of pretzels.
While these cuties take both time and patience, they aren’t very difficult to make. They make a fun and cute treat that the kids absolutely loved to look at and eat!
Chocolate Pretzel Chicks and Bunnies
Equipment
Ingredients
- 1 c. yellow chocolate candy melts
- 1 c. white chocolate candy melts
- 1/4 c. orange candy melts
- 1/4 c. pink candy melts
- 1/4 c. dark chocolate melts
- 30 pretzel twists any size
Instructions
- Place a large sheet of wax paper on the table you will be working on. Place 30 pretzel twists on top leaving a space in between each one.
- Melt the yellow chocolate in the microwave in 20 seconds intervals until completely melted. Spoon into a zip top bag, seal, and cut off a corn. Pipe the yellow chocolate into 15 of the pretzel twist, filling in the three holes and covering the connecting pretzel pieces.
- Repeat with the white chocolate and remaining pretzels.
- Allow the chocolate to harden for 15 minutes.
- Melt the orange chocolate in the microwave and place in a small zip top bag. Cut only the very corner off of the bag to make a thin tip. Pipe a v shape on the left side of the pretzel to make the beak.
- Melt the dark chocolate and place in a zip top bag. Snip off the end. Pipe a dot on each chick for an eye. On the bunnies pipe two eyes and a nose on each one.
- Melt the pink chocolate in the microwave and place in a zip top bag. Cut off the corner. Pipe above the eyes of the bunny to make the ears. Then pipe below the nose to make a mouth.
- Allow the chocolate to harden for 15 minutes. Store in an air tight container for up to 1 week.
Oh, I bet your kids were the coolest at the party!
Oh, that’s just so cute! 🙂
These look cute from what I can see 🙂 Bigger pictures for us blind people like me 😉
Adorable and so easy…………I wish I was still teaching a culinary class at the local high school. We would definitely make these.
These are adorable! Your kids will love them.
Enjoy your days off!!
This is SUCH a cute idea, I love it!!