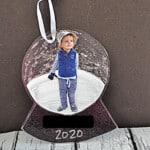
DIY Snowglobe Photo Ornaments
Adorable DIY Snowglobe Photo Ornaments take your favorite winter pictures and turn them into hanging ornaments perfect for gift giving!
Yield: 8 ornaments
Materials
- Laminator
- Laminating sheets I needed 5
- White paint
- silver or gold glitter paint
- black construction paper or cardstock
- ribbon
- photos
Instructions
- Open two laminating sheets and use a small bowl or mouth of a jar to trace four 3-4 inch circles on each of the sheets.
- Paint the bottom half of each circle with white paint. Make it into an arc so it looks like the snow has mounded up in the middle.
- On the top half you can either use the white paint to make dots that looks like snowflakes or use the silver or gold glitter paint to make it look like it is snowing.
- Wait 1-2 hours for the paint to completely dry.
- Cut out each of the photos so that there is no background. Position the image on the painted circle so that it looks like the child is playing in the snow. You can use glue of tape but I simply placed all four photos and carefully shut the laminating sheet.
- Laminate both sheets.
- Cut out the circles.
- Cut out a base for each of the 8 circles using the black paper. I used one of the circles to help make a template.
- Use a silver or gold Sharpie to write the child's name on the base along with the year.
- Place the snowglobe on top of the base and place in another laminating sheet. I was able to fit three per sheet. Laminate the sheets.
- Cut out the snowglobe and base. Punch a hole in the top and put a ribbon through it. Tie the ribbon to make a hanger to put on the tree or to use as a gift tag.
Notes
DIY craft from Crafty Morning